Thursday, December 29, 2011

End of Year Projects

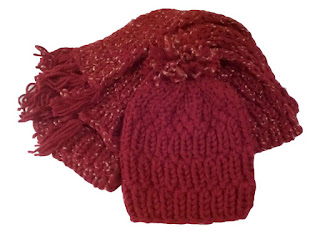
 Pictured: "Marilyn" Hat and Scarf Set


It's been a while since I've posted, and since the New Year is around the corner, I figure there's no time like the present. :)

Here's what I've been up to:

I knit my mom a hat and scarf set for Christmas. (See photos above). The hat only took me a day or so to complete.

The scarf however, took much longer...try 3 months longer!! This was partly due to the fact that I was unemployed when I started knitting it. I had half of it done when I started my new job, and then of course, the scarf sort of got put on the back burner for a while as I adjusted back to the working world. I was still knitting the darn thing on the eve before Christmas eve. Note to self: This is why scarfs need to be made with bulky yarn! they knit up faster!

Pictured: Wine Colored "Emily" Hat and Scarf


 Other things set me back as well; my cousin who is also a knitter asked that I help her out on a custom scarf and hat order for the holidays. I couldn't say no. I was itching to do it. So that set me back a few days...here's what I came up with (See photo, above, and yes, I used bulky yarn for the scarf! I learned my lesson!):


I also took the time to knit this sweet little baby bonnet. (see below) Originally, I wanted to make a couple and give them away as gifts, but the first one took so long, and then I realized I bought the wrong yarn, ( it was mercerized cotton, not regular) I gave up and decided to consider this one
a test-knit of the pattern:

Pictured: Vintage Baby Bonnet 

And lastly, I made this one. This was intended to be a new beanie for me, but I made it too short. It barely even covers my ears, so at 7 inches wide, and 8 high, and a 23 inch circumference when worn, it should be considered a pre-teen or even child's hat. I put it for sale here in my ebay store:


Pictured: Caribbean Beanie

I attempted to make another go at it with the remaining yarn, and well, I ran out of yarn. And I just hate the thought of joining a new ball just to finish the crown. So the second one is just sitting around, waiting for me to either finish it, or frog it. It will probably be the latter, because if I do that, I will make a completely new one from the new skein.

I'll add that to my new project queue for the New Year, because I still really want to make, and actually wear this hat!

Friday, November 4, 2011

Not a Beginner?

Maybe I'm not such a beginner anymore? But what does that mean anyway? How does one classify their skill level in knitting? I'm not sure.

But I came across this blog post which leads me to think that perhaps I've moved beyond the "newbie" knitting title. I certainly like to try new things and patterns, and while I've opted to tackle difficult lace patterns over cable, that doesn't mean I won't try it - eventually. I constantly watch YouTube videos on technique, and since I knit something pretty much every day (thanks to being unemployed) I'm constantly practicing.

Anyway, I liked the above post a lot, so I thought I would post.


Thursday, October 27, 2011

Find Me on Facebook!

Hi Everyone...

First, if you are reading this, thanks for following my knitting adventures and reading my blog!

If you are enjoying what you read, please find me on facebook and like my page. I think I might do a fan giveaway soon, (perhaps a free knit?) so click the link below to find me.

The link to my AZ Knitz page is here.

Happy Knitting,
Andrea

Wednesday, October 26, 2011

Close Knit Waffle Hat


Casting on...

My latest project has been the Intuitive slouch cap. Directions were easy; lace pattern was lovely, but I ended up frogging it anyway.

Why? I bought worsted weight yarn when I should have just splurged and bought the Rowan yarn the pattern suggested at my LYS. As I got into the pattern, as worsted does, the hat became more stiff rather than flexible. Not right for a slouchy cap!

I had a feeling that would happen, even as I was casting on. But my stubborn brain wanted to try the worsted anyway. This project is now in hibernation. I will pull it out again when I treat myself to some Rowan. (Perhaps when my unemployment check finally comes in?)

In the meantime, I have a few projects I am making for family and friends. One of those is the Close-knit Waffle hat. I'm going to make a few changes to this pattern, so it will hopefully be the right size to fit my friend's head. The finished pattern reads an 18" circumference, and with gauge being 3.5 stitches per inch, I figure I will cast on 8 additional stitches to create a 20" circumference. When stretched, it should be a perfect fit. I think I am going to add one or two more rounds to also increase the height.

Excited to start this project. Will post project updates as they come.

10/28/11: Finished this hat last night, or so I thought. I was down to the last 10 stitches...and it was looking all so very...small. I'm sure the circumference is right; I ended up adding 16 additional stitches instead of 8. I even added a couple additional round of the waffle stitch.

I ended up ripping it all out, back to the last purl round of the waffle stitch. I then continued to knit two more rounds of the waffle stitch. Started to look much better. Not sure, but I think I will definitely have to still knit a few more rounds before I start the decreasing. The deceasing only adds about 3 inches, so I'll keep that in mind.

Not sure why I had to make so many changes to this pattern. But I figured it out; so it's all good. Even though it is an easy pattern, I probably won't knit it again because the size is not true to the pattern. If I knit it exactly as indicated, this hat wouldn't even fit my head!

10/29/11: It's done!! Looks great. I posted the photos above. it was definitely worth ripping and adding additional rows.


Sunday, October 23, 2011

Another Brattleboro


UPDATE!

10/21/11: After sitting down with this project for a few hours, and really paying attention to the pattern repeats, and decreases....It's DONE!!

This hat gave me a lot of problems, but it was mostly me not paying attention. I would knit this again. Now that I've made this pattern a few times, I'm unhappy with the first one I made.

I'm chalking that one up to "first-time knitting-a-pattern mistakes."

I'd like to knit another one of these, (for me) with a Malabrigo yarn. I really like the Bijou Blue color.

But it will have to wait. I have way too many projects sitting in my queue, namely Christmas gifts!


_ _ _ _ _ _ _ _ _ _ _ _ _ _


10/20/2011:

Knitting of this is hat is

going

very

slowly.

Aaaargh!

Knitting the band was easy. I finished this in approximately 3 hours, and it only took me that long because I was distracted by the TV.

Then I put it aside to block, and ended up making a baby hat and mitt set in the meanwhile.

After those were mailed off, I picked the band back up and proceeded to pick up the stitches along the edge. Of course, I got cocky with this one and attempted to pick up the stitches without properly marking off small areas. So I ended up making a total mess, and ripped it out, and picked up the stitches a second time.

I decided to magic loop this hat, and when I went to start knitting, I realized I had only bought a "36 inch circular instead of "48 ish which would have of course, been much easier. The first few rows of the moss pattern were extremely difficult. Now that I've knit a few rounds, it's getting easier.

Hopefully the rest of the hat will go smoothly, and I will achieve the result I am aiming for!


Saturday, October 22, 2011

Knitting Tight

I used to do this, literally.

I've only been knitting for 8 months, but when I first learned how to knit, I found myself clutching the yarn, wound a couple times over (and tightly) in my left hand (I'm a Continental knitter). After a few hours of working on a project, my hand would ache, be a little red, and I had to put my work down for a bit and relax before I could resume.

My cast-on was also too tight; the yarn would break and split when I attempted to thread my needle through the loops. All very big indications that I was doing something incorrectly.

Eventually, I learned to relax my tension a bit, and released the death grip. But I still felt as though something was off, because I was still not knitting as quickly or as smoothly as I would have liked.

And then I came across this blog post: "Tight Knitting isn't Knitting Tight"

It changed my life! And I learned I should be knitting tightly.

What? Yeah, I was a bit perplexed too.

But as I read on, I came to understand needle size has much to do with it. The author of this blog post explained that "It is the size of the needle that determines the tightness of the fabric, not whether you have a death grip on the yarn...decrease needle size for hats mittens and socks, and increase for loose fabric projects."

By paying attention to how I was holding the yarn, and what size needles I was using, the tension became more even in my work.

So now I am knitting tightly...in a good way!

Wednesday, October 19, 2011

Baby Girl Gift Set


Here's a little set that I knit up for a family friend after I learned she gave birth to a little girl the other day. I love these baby patterns; they are simple and sweet. They are basically my "go to" patterns for baby hats and mitts. I used US 7, 4.5 mm circulars using the magic loop technique.

This was also the first time I have worked with two different colors. It was much easier than I had anticipated, and after watching a quick tutorial on joining two different balls, I was ready to go. I used Sugar n' Cream 100% cotton yarn, and the colors are Pink Rose and Buttercream.

I like to use 100% cotton whenever working on baby projects as the yarn is very soft. I wouldn't want to use anything other than this as these items will be very close to the baby's skin.

Here's the link to the (free) hat and mitt patterns:

Hat Pattern by Tonya Wagner

Baby Mitts by Susan B. Anderson


Sunday, October 16, 2011

The Brattleboro Project

I recently received the book New England Knits by Cecily Glowik MacDonald and Melissa LaBarre. I particularly like these two knitwear designers due to the modern spin they put on their knitwear. Just beautiful. And since they are both from around here (MA and CT, I believe?)  thus the title, all their works have that quintessential New England feel.

After drooling over this book for months, I checked it out of the library to get a feel for the patterns to see if it was worth investing in, and then, my mother-in-law surprised me with it! YAY!

I've only been knitting for 8 months, but the Brattleboro hat on page 54 caught my eye. I became, rather, I AM, obsessed with this hat! It was the main reason for my wanting to purchase the book. ( I had seen people photos of it over and over on Ravelry).  However, I was not sure if this project was beyond my skill level, but decided to give it a go. I've been practicing different stitches and became very familiar with the moss stitch due to a baby blanket I just finished ( can't post it yet just in case the new mom reads this!)

I finished the ribbing part of the hat in a day and then the project sat dormant for a few while the rib blocked as to encourage it to relax. When it was finally dry, I picked up the stitches along the edge and joined with my circular. The rounds of moss stitch came easily to me since I felt I had mastered it with my previous project...and then came the decreasing.

That's where the challenge began. I wish I had come across this blog sooner, because it is explained perfectly here. When I knit this hat again, I will definitely follow these directions. I'm glad I came across this blog, because it seemed that even experienced knitters were having difficulty with the pattern. That made me feel all the better because, after all, I am still a beginner!

All in all, I completed the hat and it came out like this:

Pretty decent job for a beginner, ehh? ;)

My only complaint about this hat is the way the decreases came out. For those who don't know what that means, it is the point where you start shaping the crown of the hat. You can't tell from this photo, but I don't think they came out exactly right. I studied the hat images from the blog above and mine came out very different.

The pattern does not indicate when to switch from circulars to DPN's, but I just made the obvious switch to DPN's when the decreasing became difficult. There is a point when you just cannot continue decreasing in the round, (unless you are magic looping) and must switch.

I emailed the author of the blog above to see what her method was. I'm hoping she can shed some light into the process.

 If I don't hear back, I am thinking of just going out to get a 40" circular and magic loop it. I do know how to do that, and just knit a bunch of baby items with this method that would have been a pain in the ass otherwise with those tiny DPN's.

Hopefully, that will fix the problem, but it bothers me that I would have to deviate from the suggested needles in the pattern. Oh well!  What can I say, I'm a perfectionist.  :)

Update: The author just emailed me back (that was quick, thank-you, thank you!) and advised me to magic loop or use 2 circulars. I'm more familiar with magic loop, so magic loop it is! I'll post the results when I am finished.

Most Recent Posts